Studio J

Wednesday, April 13, 2011

Layered Flower Technique Blog Hop

Hope you are enjoying the Blog Hop. In case you are stopping here first, here is how it works. 11 of us are highlighting the "Layered Flowers Technique from page 7 in the Sping/Summer 2011 Idea Book. The hop is a great big circle so you can begin anywhere and just follow the links back to where you started. (If you would like to go to the page where everyone's blog addresses are listed go to Debi Barber's blog. If you found me from Carol Harris' blog you are in the right loop! ;) Although this is called the Layered FLOWER technique I am in love with this peacock stamp set so I altered the technique a smidge and tried it with feathers. Hope you are inspired.


If you are interested in the details keep reading otherwise you can hop on over to Heather Martin's blog Heather's blog and find another way to utilize this technique. Be sure to leave a comment here before you go and let me know what you think of my adaptation of this technique and happy hopping.


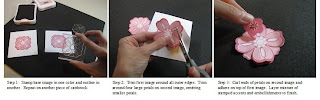
To create this look I masked the base image and stamped onto the 2 3/4" x 2 3/4" white daisy cardstock. Next I used a seperate piece of cardstock and stamped the image again in crystal blue and again in sweet leaf. I trimmed the image leaving only the body and feathers for the successive layers.


I then used a craft knife to carefully cut around the oval shaped feathers on the peacock's body on the top two layers. Once I finished trimming I curled the edges and inked the edges to create a crisp edge.


Once I was satisfied with the layers I used Tombow adhesive to tape the images onto each other. Last I added tiny sparkles in blues and greens for the eyes and "eyes" of the feathers.


To make a card like this you need:


D1438 Circle of Love Stamp Set


D1472 Simple Memories Stamp Set


X7133b Miracle Level 2 Paper pack


Z2153 Sweet Leaf and Z2117 Crystal Blue Ink Pads


Z1327 Sparkles - Blue and Green Assortment


Here are some pictures of the basic technique:


Thanks for stopping by. Please continue on to Heather's Blog and see how Heather has used this fun technique.

Saturday, April 9, 2011

Blog Addiction?

Is there such a thing? I am hooked on peeking into people's craft rooms and reading their clever insights. I especially love hearing the funny stories! I added a few blogs that I have started following. Any other suggestions? I, of course, love blogs that are crafty. :) New blog hop coming soon. Hope you can all pop back in to see the amazing artwork my fellow consultants have come up with! We are off to get family photos tomorrow. You know you are scrapbooker when...you take a camera to the photo shoot anticipating the drama of getting the "wall ready" picture. :) I am looking forward to those pages. In the meantime, happy scrapin' Amy

Sunday, April 3, 2011

Miracle Workshop Pics

Miracle workshop Monday, April 18th 6-8 at my place! We will make these pages and 2 more OR you can make 2 each of 6 cards. Cost is $35 and includes Level 2 paper, stamp set and color ready craft borders. You WILL have lots of leftovers. :) Register by Wed. April 6th by calling or emailing. See you there. In the meantime: Happy Scrapin'

Saturday, April 2, 2011

Use up those leftovers


This one uses felt shapes, ribbon and a fancy metal brad. All left over from scrapbook pages and other projects!

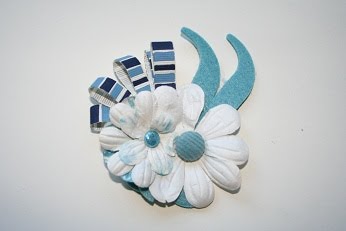
The back or base of each barrette is a piece of cardstock punched with the new 2 1/4" scalloped circle punch. I added the embellishments on top with a hot glue gun and on the back I glued a clip from the hair salon store. Before gluing on the clip I add a piece of ribbon inside the clip to prevent the extra glue from permanently closing the clip (it also adds a little traction for your hair!) If you want a more finished look you can layer the ribbon ALL the way around the top of the clip too but it isn't necessary if you use it as a hair clip.


These are made ENTIRELY of paper and I will post later with a short tutorial on how to make these.


Big pink and white flowers and a single button with a single gem inside.
More big flowers a button some pink pom pom ribbon and a few sparkles.
For this one I folded the flowers in half and glued them down then scrunched the ribbon by pulling the thread on one side before shaping it into the circle. I added a couple of "parentheses" shaped felts that are folded in half to look like leaves.
The red flowers are from the collection that has tulip and creme brule colored flowers and butterflies. I added felt leaves and opaque gems.
This has a fabric brad a bit of ribbon and paper and felt flowers.
Big white flower on bottom then ribbon folds then pink flower topped off with a chipboard button and a white clip. I used a tiny gem to cover the button hole!
This is the cardstock base covered with the hearts I had left over from the rosette ribbon in the pink ribbon collection. I scrunched them up and glued them down. The pink pom pom ribbon just jazzes it up a touch.
I got this idea from the Scrabooks, Etc. magazine. Just thought it was cute!
On this one I used more white flowers and added some blue to the flowers with a marker (heavenly blue) I sprayed the flowers with the spray pen filled with water to blend the color. The brads are fabric and glitter.
Here is one of the creme brule butterflies! felt and paper flowers.
All the paper flowers were folded in 1/2 before I glued them down for this one! Then I added another one of the ribbon hearts.
Same as above with pom pom ribbon all rolled up in the center.
Ribbon base then flowers, make sure that you insert the brad BEFORE you glue the flower down. ;)
Just to get an idea of the sizes.
Simple and sweet.
Lots of sparkles.

This one is made with Big Pinks and Pink Pom Pom Ribbon (from the new Pink Ribbon Collection). I also added a schmear of glitz glitter glue to the center because everything can use a little glitter!


I hope this all inspires you to use up your scraps! (This is just a fun way to spring clean.)

Happy Scrappin'