
This blog has moved...
I have created a new blog at creativeagents.blogspot.com
visit there for any new ideas, inspiration and secret missions. :)
Sunday, July 31, 2011
Sunday, June 12, 2011
June's Studio J "Love Your Layout"
Having fun playing with Miracle? Try it digitally and you can download a free .jpg (you can also create a free account if you don't already have one).
Wednesday, June 1, 2011
"Ganga" Deal of the Week!
Attention shoppers: this will be a new feature on my blog. I have been bitten by the coupon bug. :)
I have discovered that if I save my Sunday paper's coupon insert I can match up the big sales at the store with the older coupons and get FREE stuff! (Or extremely cheap stuff.)
This week (5/29-6/4/11) you can get the OFF Clip On starter kits for only $3 each at Walgreen's. (Regularly $9.99 each)
These are the newish product from OFF that you clip onto your clothing and it emits the OFF "smell" to repel mosquitoes and you don't have to spray that gunk on your skin!
I get GIGANTIC welts from those pesky critters and HATE mosquitoes!!!!!! So this is an exciting deal. Here's how:
Go to B1G1Free .com (just click on that link) I am not sure how long it will be active so do it NOW!
Print 2 of the Buy 1 Get 1 Free OFF clip on coupons. (say that 3times fast)
Take the coupons to Walgreen's where the OFF starter kit is on sale for $7.99/ea. Get 4 starter kits.
Get the Walgreen's June in store coupon booklet where there is a $1 off coupon for any OFF product (also good for Raid) Your total for you order after your coupons will be $12 with tax!
That is only $3 EACH for the kit. Woo hOO!!! you just scored your first GANGA deal. Keep posted each Sunday or Monday for my GANGA deal of the week. :) Feel free to share your super coupon deals in the comments.
Friday, May 27, 2011
Love your layout with Studio J
Close to My Heart has created fun videos to show some Studio J techniques. In the first one you learn how to add a mat to a photo in order to highlight the picutre, use the Quick Title Tool and how to layer Stickease using the software. Watch the first Love your Layout video here it is only about 3 minutes!
Leave a comment and let me know what you think of the techniques!
Leave a comment and let me know what you think of the techniques!
Thursday, May 5, 2011
Studio J Boot Camp Rock(s)!
I had the privilege of attending Studio J Boot Camp this week in Salt Lake City and learned a TON of new techniques for online memory preservation. Oh yes and it was sooooo fun and felt a bit like boot camp after that first day of 15 hours in front of the computer....here are the gorgeous (if I do say so myself) results:
Above we layered the title. These pages show Oliver, Eloise and Xander exploring the Ella Sharp Museum in Jackson..."What? They had to get water out of the ground?!"


Above we layered the title. These pages show Oliver, Eloise and Xander exploring the Ella Sharp Museum in Jackson..."What? They had to get water out of the ground?!"

Above we are all at Agua Linda Farms in Amado, AZ looking for pumpkins, flowers and all things fall.
Above Eloise and Oliver had their faces painted at the mall on family day and were sooooo proud of the disguise.
 Above are photos taken a year ago when Scarlet was born...last Mother's Day in fact! That is my brother, sister in law and baby Scarlet. My parents and the kids and I are in the smaller photos.
 Above are the title page and the back page for the book...so the photos don't necessarily match. What fun rain in desert can be.
 Above we are back at Agua Linda...how cool is that picture with the hay stack mountain! Easy technique; just drop your photo into the wells same picture 4 photo wells, then increase the size of each one to at least 200% adjust the position and sit back to appreciate your mad artistic skills! :)

The kids first Build A Bear experience (all cell phone pictures)!
 Can you guess which kit this is???? ALL the colors have been changed. Had to have Chocolate to highlight our trip to Gilbert Chocolates at Ackerson Lake. Leave a comment with your guess and I can send a goodie to the winner!

The princess Eloise had fun with the baby frogs last fall. Don't worry we always washed our hands thoroughly after each frog find!

Above Eloise and Oliver had their faces painted at the mall on family day and were sooooo proud of the disguise.
 Above are photos taken a year ago when Scarlet was born...last Mother's Day in fact! That is my brother, sister in law and baby Scarlet. My parents and the kids and I are in the smaller photos.
 Above are the title page and the back page for the book...so the photos don't necessarily match. What fun rain in desert can be.
 Above we are back at Agua Linda...how cool is that picture with the hay stack mountain! Easy technique; just drop your photo into the wells same picture 4 photo wells, then increase the size of each one to at least 200% adjust the position and sit back to appreciate your mad artistic skills! :)
The kids first Build A Bear experience (all cell phone pictures)!
 Can you guess which kit this is???? ALL the colors have been changed. Had to have Chocolate to highlight our trip to Gilbert Chocolates at Ackerson Lake. Leave a comment with your guess and I can send a goodie to the winner!
The princess Eloise had fun with the baby frogs last fall. Don't worry we always washed our hands thoroughly after each frog find!
Tuesday, May 3, 2011
Studio J Bootcamp
Today I am in Utah, impatiently awaiting the start of bootcamp. :)
We will be learning the ins and outs of using this software and I will have sooooo many cool tips to teach when I return.
Stay tuned for pictures of the layouts, video tutorials and more studio scrapbooking fun.
We will be learning the ins and outs of using this software and I will have sooooo many cool tips to teach when I return.
Stay tuned for pictures of the layouts, video tutorials and more studio scrapbooking fun.
Wednesday, April 13, 2011
Layered Flower Technique Blog Hop
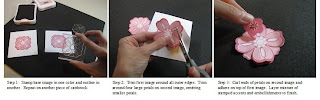
Hope you are enjoying the Blog Hop. In case you are stopping here first, here is how it works. 11 of us are highlighting the "Layered Flowers Technique from page 7 in the Sping/Summer 2011 Idea Book. The hop is a great big circle so you can begin anywhere and just follow the links back to where you started. (If you would like to go to the page where everyone's blog addresses are listed go to Debi Barber's blog. If you found me from Carol Harris' blog you are in the right loop! ;) Although this is called the Layered FLOWER technique I am in love with this peacock stamp set so I altered the technique a smidge and tried it with feathers. Hope you are inspired.
 Thanks for stopping by. Please continue on to Heather's Blog and see how Heather has used this fun technique.

If you are interested in the details keep reading otherwise you can hop on over to Heather Martin's blog Heather's blog and find another way to utilize this technique. Be sure to leave a comment here before you go and let me know what you think of my adaptation of this technique and happy hopping.
To create this look I masked the base image and stamped onto the 2 3/4" x 2 3/4" white daisy cardstock. Next I used a seperate piece of cardstock and stamped the image again in crystal blue and again in sweet leaf. I trimmed the image leaving only the body and feathers for the successive layers.
I then used a craft knife to carefully cut around the oval shaped feathers on the peacock's body on the top two layers. Once I finished trimming I curled the edges and inked the edges to create a crisp edge.
Once I was satisfied with the layers I used Tombow adhesive to tape the images onto each other. Last I added tiny sparkles in blues and greens for the eyes and "eyes" of the feathers.
To make a card like this you need:
D1438 Circle of Love Stamp Set
D1472 Simple Memories Stamp Set
X7133b Miracle Level 2 Paper pack
Z2153 Sweet Leaf and Z2117 Crystal Blue Ink Pads
Z1327 Sparkles - Blue and Green Assortment
Here are some pictures of the basic technique:
Thanks for stopping by. Please continue on to Heather's Blog and see how Heather has used this fun technique.
Saturday, April 9, 2011
Blog Addiction?
Is there such a thing? I am hooked on peeking into people's craft rooms and reading their clever insights. I especially love hearing the funny stories! I added a few blogs that I have started following. Any other suggestions? I, of course, love blogs that are crafty. :) New blog hop coming soon. Hope you can all pop back in to see the amazing artwork my fellow consultants have come up with! We are off to get family photos tomorrow. You know you are scrapbooker when...you take a camera to the photo shoot anticipating the drama of getting the "wall ready" picture. :) I am looking forward to those pages. In the meantime, happy scrapin' Amy
Sunday, April 3, 2011
Miracle Workshop Pics
Miracle workshop Monday, April 18th 6-8 at my place! We will make these pages and 2 more OR you can make 2 each of 6 cards. Cost is $35 and includes Level 2 paper, stamp set and color ready craft borders. You WILL have lots of leftovers. :) Register by Wed. April 6th by calling or emailing. See you there. In the meantime: Happy Scrapin'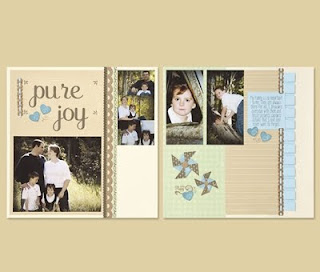

Saturday, April 2, 2011
Use up those leftovers
 This one uses felt shapes, ribbon and a fancy metal brad. All left over from scrapbook pages and other projects!
 The back or base of each barrette is a piece of cardstock punched with the new 2 1/4" scalloped circle punch. I added the embellishments on top with a hot glue gun and on the back I glued a clip from the hair salon store. Before gluing on the clip I add a piece of ribbon inside the clip to prevent the extra glue from permanently closing the clip (it also adds a little traction for your hair!) If you want a more finished look you can layer the ribbon ALL the way around the top of the clip too but it isn't necessary if you use it as a hair clip.
  These are made ENTIRELY of paper and I will post later with a short tutorial on how to make these.
  Big pink and white flowers and a single button with a single gem inside.
  More big flowers a button some pink pom pom ribbon and a few sparkles.
  For this one I folded the flowers in half and glued them down then scrunched the ribbon by pulling the thread on one side before shaping it into the circle. I added a couple of "parentheses" shaped felts that are folded in half to look like leaves.
  The red flowers are from the collection that has tulip and creme brule colored flowers and butterflies. I added felt leaves and opaque gems.
  This has a fabric brad a bit of ribbon and paper and felt flowers.
  Big white flower on bottom then ribbon folds then pink flower topped off with a chipboard button and a white clip. I used a tiny gem to cover the button hole!
  This is the cardstock base covered with the hearts I had left over from the rosette ribbon in the pink ribbon collection. I scrunched them up and glued them down. The pink pom pom ribbon just jazzes it up a touch.
  I got this idea from the Scrabooks, Etc. magazine. Just thought it was cute!
 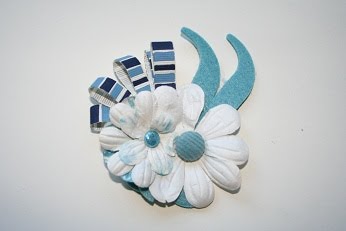 On this one I used more white flowers and added some blue to the flowers with a marker (heavenly blue) I sprayed the flowers with the spray pen filled with water to blend the color. The brads are fabric and glitter.
  Here is one of the creme brule butterflies! felt and paper flowers.
  All the paper flowers were folded in 1/2 before I glued them down for this one! Then I added another one of the ribbon hearts.
  Same as above with pom pom ribbon all rolled up in the center.
  Ribbon base then flowers, make sure that you insert the brad BEFORE you glue the flower down. ;)
  Just to get an idea of the sizes.
  Simple and sweet.
  Lots of sparkles.
  This one is made with Big Pinks and Pink Pom Pom Ribbon (from the new Pink Ribbon Collection). I also added a schmear of glitz glitter glue to the center because everything can use a little glitter!
 I hope this all inspires you to use up your scraps! (This is just a fun way to spring clean.)
Happy Scrappin'
Thursday, March 31, 2011
Use up the scraps and make barrettes!

I learned this project from Jody Peck and I have no idea who gave her the idea but it is FABULOUS!
At school there is a "carnival" tomorrow and I will be selling these cute barrettes....if I can bear to let them go!
They range in size from 3" diameter to over 6" diameter the back is just a simple clip from Sally's beauty supply. Just use up all the leftover embellishments from past projects and have at it. I did order some of the clearanced "Big Pinks" from my website to fill in the gaps. You can make a ribbon base or a flower base. You can even just use paper but I wasn't feeling patient...do I ever feel patient? So I didn't want to take time to fold paper into ribbon...another day.
I have to go pick up something for supper so I have to post some more pics later!
Happy Scappin'!
Monday, March 14, 2011
Spring break?
Why is it that every time we get a few days off from work I pack the days so full of chores and activities that it is NOT a break?
Mike and I were a great team this weekend and did a major spring cleaning. I even found those library books that I couldn't renew anymore! (They were returned today and we are all paid up.) Now I just have to write report cards for 23 1st Graders and be ready to drive to Vegas Wednesday night.
Oh, and plan for school and finish cleaning the garage, and prepare for some scrapbooking events, and... I better get to it!
Until next time, Happy Scrapin'
Thursday, March 10, 2011
Designer Ribbon Pink Collection
Love this ribbon. We made some of the "brooches" at Friday's club. I use it in my hair with a barrette underneath.
A great way to use up extra accessories!
Friday, February 25, 2011
Buy 9 Get 1 Free = Get your book updated.
It is soooo satisfying to complete 20 (yes, TWENTY) scrapbook pages in one week! Maybe there are those of you that have finished many more but I always end up missing a picture or not completing the journaling. SOMETHING always seems undone when I do lots of pages at once. Not the case when I use my online Studio J. Love Love LOVE it! Here are my creations, the descriptions are below the pages:
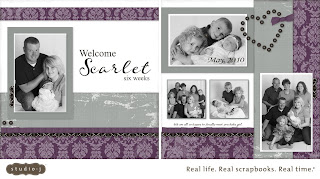
 Here is my niece Scarlet! When my mom visited she had these pix on her camera so I copied them onto my computer. Now I have a great gift for my brother and soon to be sister. :) (Not to mention GG and Grandpa of course!)
 These layouts use the Jingle paper pack which is great for Holiday and Birthday pictures.
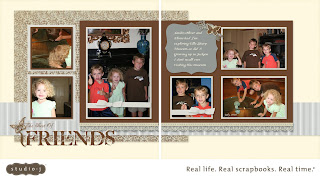
 Look at those baby blues! Love this girl (and my redneck brother...come on Den, who wears hunting camps to Christmas parties!) Man I really miss my family sometimes. :)
One of the cool things about the online scrapbooking is that I only have to create the page once then order multiple copies rather than make double of everything! (or triple)
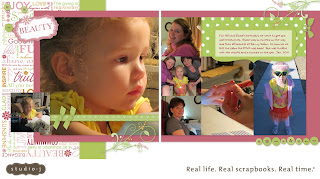 These pages honor Eloise's first manicure. GG and Eloise have birthdays only one day apart so when she visits we celebrate together. They are so much alike! My mom loves shoes, Eloise loves shoes; Mom loves to shop, Eloise loves to shop; nails...you get the picture.

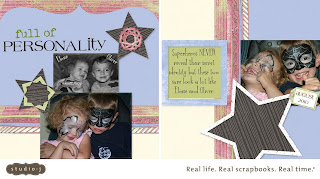
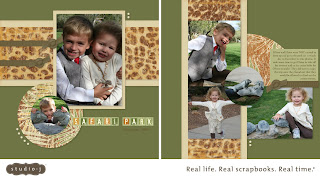 These pictures are the result of an attempt to get photos for the Christmas cards this year...that's always fun. ;)
 These pages honor Eloise's first manicure. GG and Eloise have birthdays only one day apart so when she visits we celebrate together. They are so much alike! My mom loves shoes, Eloise loves shoes; Mom loves to shop, Eloise loves to shop; nails...you get the picture.
 It was a fun day for the little diva. This layout uses the Sophia paper pack and lots of Stickease. In Studio J you can resise the Stickease to fit wherever you want (up to 200x the original size). The flourishes are stickers and so is the "ribbon". There were also button-like Stickease but I wanted to use the easy option.

The layout above was inspired in the moment when we were at the park for Christmas pix and Oliver's shoe came untied. He just learned the day before how to tie them...serendipity. (Bliss paper pack!) I only added stickease and colorized the pre-selected accents. I changed the paper on the journaling and title spaces to the same color as the paper below (default for journaling and title space paper is velum) then changed the font color to Colonial White to match the base paper. Bliss is not only for weddings. It is a great neutral pallet for many photos.
 These pictures are the result of an attempt to get photos for the Christmas cards this year...that's always fun. ;)
I got to use the RETIRED paper pack that was sold out before I was even a customer of CTMH let alone a consultant. Useful tip: when you run out of the paper you need and learn it is sold out or retired...go to Studio J! Gotta love print on demand.
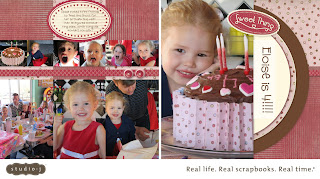 Eloise turned 4 in January and i already have the pages done! Woo HOO! Love the online scrapbooking. I use online scraping for new photos so I don't have to print them all. I am still obsessed with classic scrapbooking...I just have all those boxes of pictures to finish. This way I found balance with new and classic. Zero guilt = Happy Scrappy
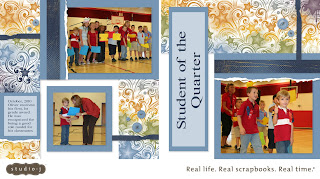
On this layout I used "You Rock" to show what a rock star my little guy is! I think it was supposed to be student of the month but who's counting. ;)
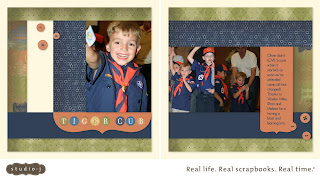 Above Oliver shines as a Tiger Cub. Using the Lucky paper pack I was able to move the focus onto that excited smile rather than the awesome paper. This was his first patch.
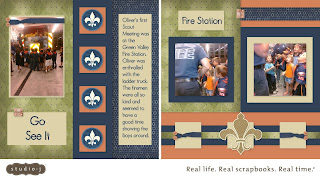 Above are the pictures from my cell phone! Forgot the camera for the first cub scout Go See It (and his first meeting). Mike has been in charge of Scouting events since that day. :)
Eloise turned 4 in January and i already have the pages done! Woo HOO! Love the online scrapbooking. I use online scraping for new photos so I don't have to print them all. I am still obsessed with classic scrapbooking...I just have all those boxes of pictures to finish. This way I found balance with new and classic. Zero guilt = Happy ScrappyOn this layout I used "You Rock" to show what a rock star my little guy is! I think it was supposed to be student of the month but who's counting. ;)

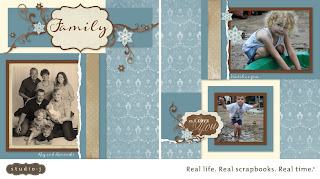
In the layout above I chose the Sweetheart paper pack (loooove it!). This layout showcases my angel baby, Eloise. She loves to 'help' with the chores each day. Now that I am back at work full time I wanted to memorialize the time we had when Oliver was at school 1st quarter.
Above Oliver shines as a Tiger Cub. Using the Lucky paper pack I was able to move the focus onto that excited smile rather than the awesome paper. This was his first patch.Above are the pictures from my cell phone! Forgot the camera for the first cub scout Go See It (and his first meeting). Mike has been in charge of Scouting events since that day. :) Now it is your turn! If you have taken advantage of this special or created some art in Studio J this month become a follower of this blog and send me your Jpeg images for the wep and your mailing address. I will post what I get and send you a goodie in the mail! (If you don't want the goodie don't send your address.) Happy posting! I know Kathleen has been working hard and Shonie has her daughter in the Studio J sweat shop! :) Let's see what you've been working on.
Happy Scrappin'
Happy Scrappin'
Sunday, February 6, 2011

Interview on Blog Talk Radio
Click on the link to the left to hear why everyone has gone crazy for scrapbooking.
If you haven't discovered Sharon Michaels yet please check out her show. She is such an inspiration for women in business. Sharon has helped to increase my confidence and focus on what matters in building a business. If you have ever had a day when you wondered what to do next or if you doubt your ability to reach your goals then sign up for her newsletter and listen to her radio program to get the support you need.
Life as a home based business owner can be lonely when you forget to look for help!
Enjoy the show and email me when you are ready to start your own scrapbooking business...time to jump on the bandwagon. :)
Subscribe to:
Comments (Atom)


